
By Charles-Arthur BOURGET
With this tutorial you'll be learning how to export a character from akeytsu to Unreal Engine 4. A few pointers are given to retarget humanoid characters through the UE4 humanoid rig. We also cover how to edit your animations effectively from akeytsu and reimport into UE4 by using a single FBX file as a bridge.
Full tutorial video in video follows with important written notes underneath. Go to YouTube for quick access to video chapters
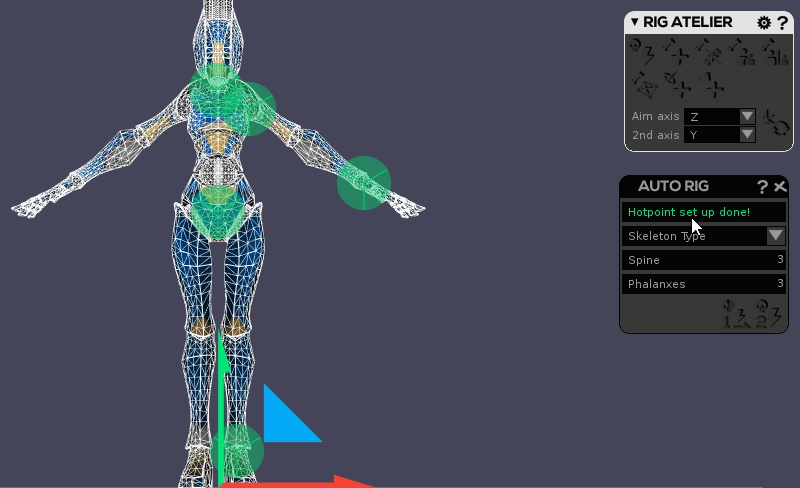
AUTO RIG YOUR BIPED CHARACTER
To optimize your biped rig for Unreal Engine 4, select your mesh in Bind Pose and start the Auto Rig by clicking on the first button in the Rig Atelier. Make sure you select UE4 skeleton as skeleton archetype. The generated rig can then be edited with our toolset but already features correct naming conventions matching UE4 mannequin.
EXPORT OPTIONS (akeytsu)
- Access akeytsu FBX Export Preferences by clicking on the View & Preferences logo at the bottom-left corner and go in Preferences. Navigate to the right section.
- Select desired export preferences
- Go to Export FBX in akeytsu File Menu (accessed through akeytsu logo at the top-left corner) or press CTRL + E
- Choose Export Scene by default. Other options are detailed in the video
- Give a name and choose a location for your file
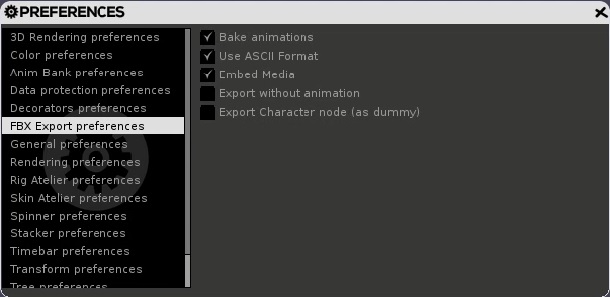
Akeytsu default FBX Export preferences
IMPORT OPTIONS IN UE4
- In Unreal Engine, click on the “Import” button in the “Content Browser” tab.
- ⚠ Don’t use the import button of the main menu as it will create a rotation issue with your file!
- Select desired import options
- Make sure you clear skeleton if UE4 is trying to tie your mesh with another skeleton already in library
- Choose Import or Import All depending on the situation
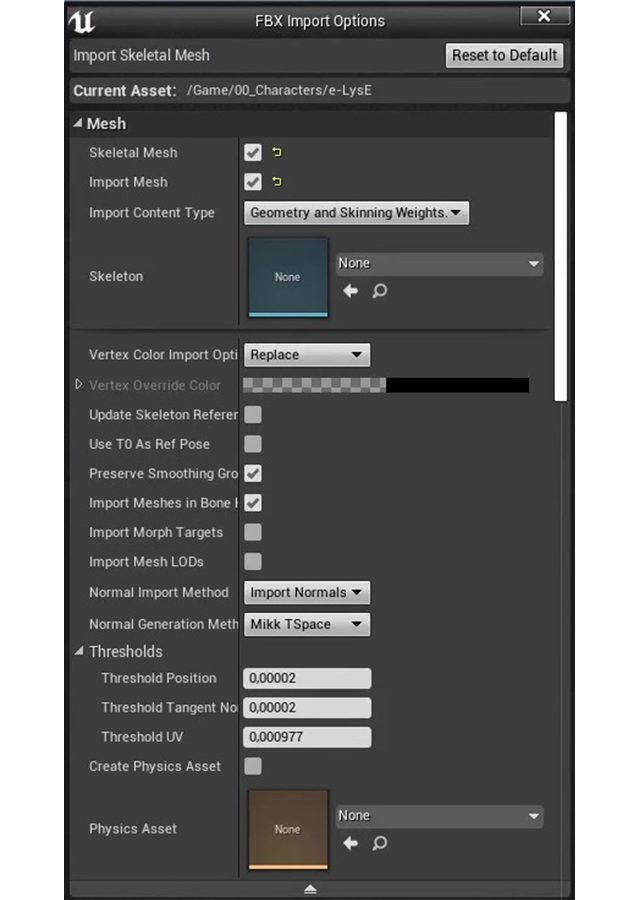
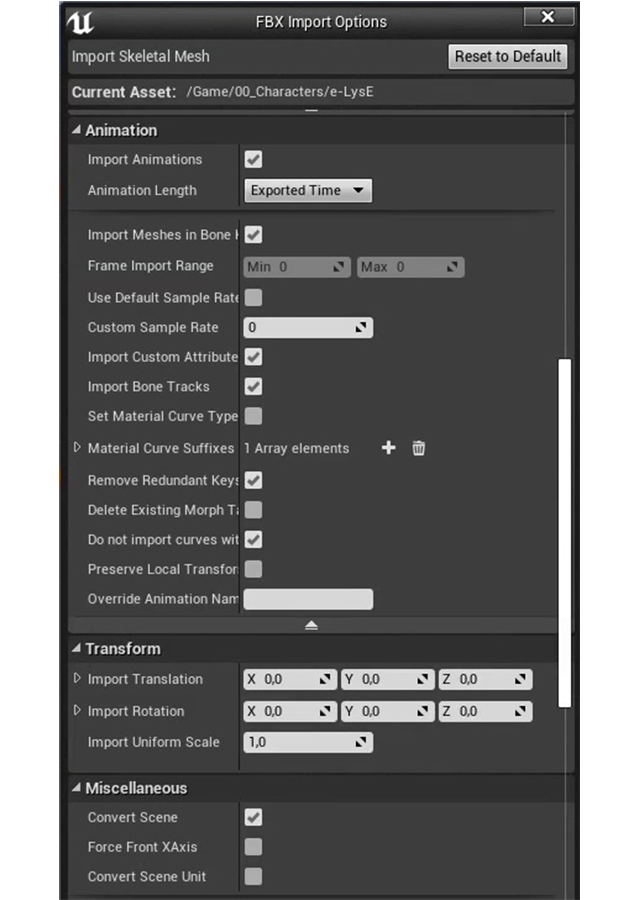
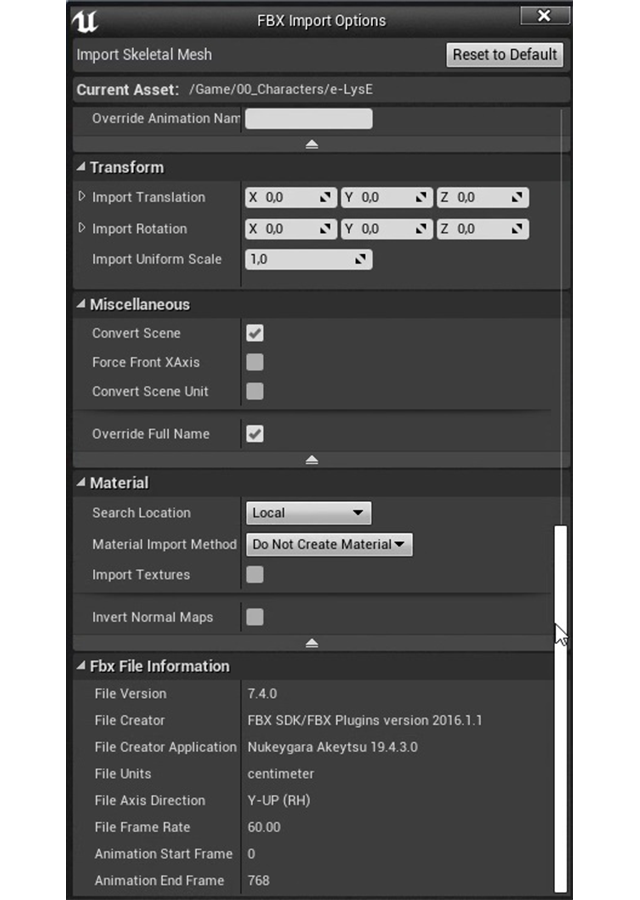
UE 4 FBX Import options used in tutorial video
(These are for a 3D model with specific normal vertices, baked normal maps and PBR textures and may change depending on your project
ASSET REVIEW & PREPARATION
- Check that mesh, skeleton and animations have been loaded correctly by looking at what's listed in the Content Browser
- Double-click Mesh thumbnail and take a glance at the top-right corner to make sure the right skeleton has been assigned
- Next to the skeleton icon at the top-right corner click on animations and make sure all clips are listed correctly
- In the Skeleton tab, click on Retarget Manager if you'd like to retarget through UE4 humanoid rig
- In “Set up Rig” tab, choose “Humanoid” in the "Select Rig" dropdown list
- Bone list appears below “Select Rig” list.
- Match bones with UE4 humanoid conventions. If you used the right settings for akeytsu Auto Rig bones are correctly named and you just have to save
EDITING ANIMATIONS AND RELOADING FILES
With this method we'll be using a single FBX file as a bridge to import updated versions of akeytsu animations in UE4:
- Go back to akeytsu and tweak your animation as desired with your toolset
- Select edited animation in Anim Bank
- Choose Export Scene (only selected animations) in Export FBX options
- Overwrite previously exported FBX ( UE4 keeps its own source assets for what you import in the engine)
- In Unreal animation tab of your mesh click on Reimport Animation in the Top Bar
- Feel free to export any number of animations in the FBX that you need to update
ADDING A NEW ANIMATION
Ideally you would want to define all animations for a given character at the first import or at least leave a blank animation for it. But we all know that through production new needs may appear that would call for more animations to be done. Here is how you would be able to successfully assign new animation to an imported mesh.
- Export Scene (selected animations only) with at least a couple of animation clips
- Overwrite the same FBX than before
- Load this one in a different Content Browser in Unreal Engine 4
- Drag and drop the animation to the initial folder and choose "Move here" (Do not copy)
- You will be prompted to choose a skeleton for the new animation. Simply select the one imported initially
- In the Animation Tab of your mesh make sure the new animation has been added
EXPORTING FROM UE4 TO AKEYTSU
You may want to export from Unreal Engine to akeytsu in case you've edited part of your animation there or simply want to check whether Unreal is reading everything correctly. In this case proceed as below:
- Go to Asset in UE4 navigation bar
- Choose Export to FBX and proceed to export just animation data or preview meshes
- Choose the right FBX version and select other data that you'd like to bake in the export
- You can then open it up in akeytsu and troubleshoot any weird behaviour
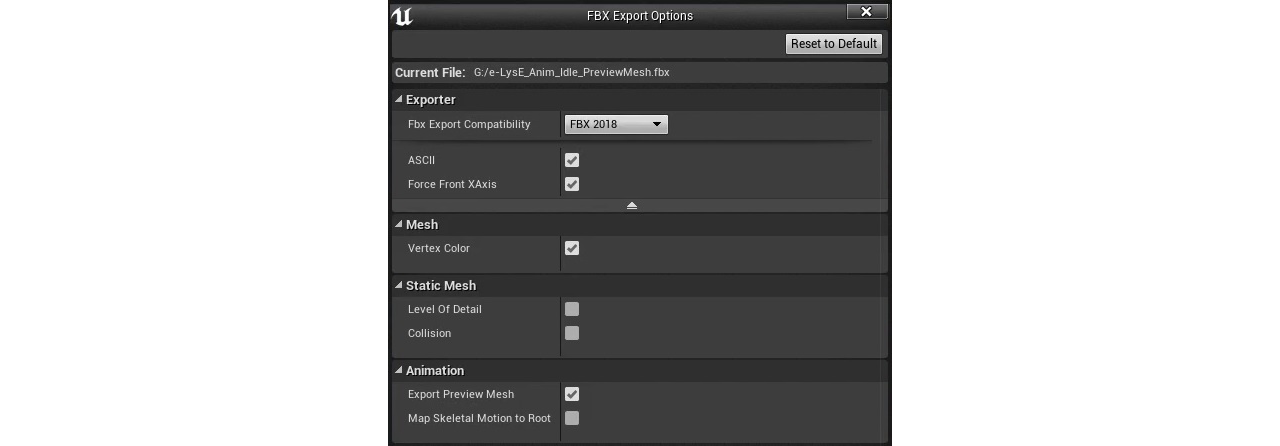
UE4 FBX Export options used in tutorial video
(No Physics Asset)
We need your help to make akeytsu a better tool.
Write us on forums or our discord channel if you would like us to consider improvements.